Thursday, March 7, 2024

The Start of a Greenhouse

 Hey mini friends!

I had thought about making the windows for the greenhouse myself, but that would've had me in a straitjacket. Instead, I opted for purchasing ready-made windows and decided to make the doors from scratch. I also got some shutters to make shelves with


I did a little dry fit just to get an idea of size and how things would look placed inside. It turned out a bit shallower than intended, but we're going with it. 

I gave everything a base color of brown with splatters of turquoise here and there. I figured it would show through after I did some aging and sanding. I should have added another color (or two) just to give it that "re-painted over the years" look since they're supposed to be old windows. 


And because this thing isn't going to magically put itself together, we got the mini tools out. 


I have to say I'm pretty proud of these doors. I've never done anything like it. I thought they would be harder to build because well...my math never maths. LOL Surprisingly though, I got all my measurements right and even the cuts were accurate. Pretty sure it's because I mentally prepared myself, gave myself several pep talks, and dressed myself with tons and tons of patience, AND measured once, twice and then some more. 


The hinges though! The hinges!!! That was another story. I wanted them to be like real life hinges and so I had to create mortises (had to look that word up). One door went quite smoothly much to my surprise. But the other...the other!!! Ooh, she was feisty! I can't tell you how many times I had to glue one of those hinges. I lost count. I glued them all with a bit of super glue and then inserted the ever so tiny nails. But one of those hinges just would NOT cooperate. Every time I'd close the doors that one hinge just threw everything off, including itself. 

I had to do a lot of tweaking and sanding but in the end, we have two functional doors. I have to be very careful with one of them but alas, they work! LOL 

This pic is not of said troublesome hinge. I wanted to show you a pretty one. 😜


And because like I said, I'm really proud of these doors here's another pic for ya'. I still need to add door handles/ knobs. If anyone has any recommendations, please let me know. I just haven't found any that I feel would fit with the look. I want something kind of girly and vintage-y looking.


Thank you for stopping by mini friends. I hope you all have an amazing weekend! 

Big mini hugs,
Iris =)


Thursday, March 16, 2023

Planning the Greenhouse

So...in thinking ahead to what I'd like to add to the dollshouse I'll someday have, I know I would like to have a greenhouse alongside it. So last year, I perused Pinterest, as one does for all project planning LOL, and came across small greenhouses made from old windows. 

I sketched out all the things I thought I'd like to have for my greenhouse. In the end, I'll have room for some, but not all. You can see what my original idea was in my sketchbook. 


I don't think the tiny green house will make it into this project, because well...after having some struggles I'm not yet ready to talk about LOL (we'll have to discuss in another post), my patience, sanity and not made for tiny things hands won't be able to handle it. I'm a little sad about it because I really do think it would look adorable to have a tiny greenhouse on a shelf inside the mini green house. 😊


I also wanted to add a light fixture, but I just won't have the clearance on the inside for it. I'm thinking maybe I'll  add one on the outside. 

In the little pocket labeled "Inspo" I added a couple of pics to remind me of the general idea I was going for, and I also have a tag with ideas for names to call the greenhouse. I've also left a space at the top of the page to fill in the name when I have one. I also left an empty spot on the page to add some pics of the completed greenhouse. If anyone has any ideas for what I can call it I'd love to hear them as I'm really not all that crazy about what I have so far. 

The main structure is complete and even though I have documented that the project is done, it still needs door handles and a few outside tidbits. 


I have a few progress pics of the actual greenhouse that I'll have to show you in future posts. I'm not the best when it comes to taking photos so I'll have to see what I can dig up. 😊  

I hope you've enjoyed your visit. Thank you for stopping by!

Big mini hugs
-Iris =)


Thursday, March 9, 2023

Cottage Dreaming

I have a bunch of ideas for the little cottage I'd like to make, and would like to incorporate them all into one, but I'm not sure how to go about it yet. Since I can only have one small dollshouse, I'd really like to try and add all the different types of features I want in a cohesive way. At this rate, it's never going to happen. LOL

I have a few minis I've been collecting over the years and have temporarily placed them, along with some I've made, inside a little garden box/ greenhouse I recently found. 

The bench and birdhouse in this first pic are made by http://katiesclaycorner.blogspot.com/ I absolutely love her birdhouses and have quite a few different ones. The bench was a custom request she agreed to make me and I adore it. It even has a few spots on the seat that look like they could be nail holes. 


The little tray holding the books on the floor in the next pic is also made by Katie. The books themselves I got years ago from http://carolynslittlekitchen.blogspot.com/ I also have some of the adorable little plates she makes. 

I made the plant stand from wire, beads and cardstock. Mercedes from  http://libertybiberty.blogspot.com/ has a similar one in her beautiful french house and that's where I got the idea to make mine. I also made a smaller one in another color. 


This is the little set up I have created just to make myself happy in the meantime. Hopefully, I can 
get started on a little cottage at some point this year. Fingers crossed! :)


Thank you for stopping by to visit. Happy Friday Eve and have an amazing weekend!

Big mini hugs,
-Iris :)


Thursday, March 2, 2023

Is it laundry day?

Nope! Not for me. 
Although, if I had a cute laundry basket like this it might motivate me. Maybe. LOL

I made this little laundry basket with a lot of blood, sweat and tears. 
Not really. More like...frustration, sore fingers and eventually patience. 
In the end, I am happy with how it turned out for being a first try.


Believe it or not, the clothes pins were much easier to make. I couldn't find the toothpicks that already have the decorative ends so, I used the regular kind and just sanded the little groove to give it a round head. I slit the other end with a hobby knife to give it that split look. I then aged them to give them that weathered look as if they've been outside on the clothes line doing their job. I made the basket that holds them out of wood and the handle is a small piece of wire with a bead strung through. It was a tight fit getting the wire through the bead and I may or may not have split one or two others in previous attempts. 


I'm thinking maybe I'll use the other two containers as laundry detergent storage...? I made them out of wood and glued embroidery floss around them. The idea is to finish them off to look like tin/ enamel containers, with a bit of rust of course. I also would like to use water decals to label them. I made the tiny scoops out of cardstock and edged them with the same embroidery floss. They're very tiny! 


Hope you've enjoyed your visit. Thank you for stopping by.

Big Mini Hugs,
-Iris

Saturday, February 25, 2023

Vintage Tins

One day, when I have a mini house, I want to have all sorts of adorable accessories throughout. Nowadays people are creating amazing things with 3D printers and laser cutting machines, and I'm sure I will always have a growing list of all the things I'll want to get. In the meantime, I'll make what I can with what I have, and within my abilities of course. LOL

One of those things are vintage tins. Mine are a bit rusty and I'm sure over time they will get even more "loved". 😜 


I made most of them using 6x6 scrapbooking paper. The 6x6 prints are smaller and I just chose those that fit to scale better. I used acrylic paints to add the rust effect and finished everything off by giving it a coat or two of gloss medium. 


The lids and handles for some are a mixture of paper, jewelry findings, wire and buttons. In the above pics, for the round yellow "tin" I used a wooden bead for the canister itself. A button for the lid. And a tiny bead for the knob on the lid. The image is a tiny print I found in my stash.


I love how they turned out considering they are my very first attempt at making them. They have quickly become some of my favorite minis.


I hope you enjoy them as much as I do. Thank you for stopping by and I hope you are all having a lovely weekend so far.

Big mini hugs,
Iris :)


Sunday, February 19, 2023

By Candlelight

 It's a holiday weekend here in the states and that means instead of the usual, and oh so very quick two-day weekend, we get a three day weekend! I decided to use my time wisely and do absolutely nothing related to adulting. 

It's been some time since I've done anything crafty, so here I am. 😀 I made some shabby candlesticks, and mini candles using real candles, for no particular use or reason. I don't have a dollhouse or room scene to use them in, but does it really matter? I just needed the art therapy. Although, I did recently find something that might work as a roombox. Idk, we'll see. :)

Hope you enjoy the pics and your visit here. Thank you for stopping by. 


Tuesday, September 6, 2022

A little dabbling...

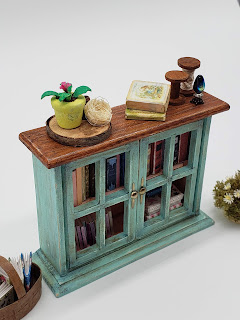
 While I have not been creating much of anything these past few years, I got a little itch recently and decided to distract myself. I made this cabinet/ bookcase by deconstructing an unfinished hutch that Michaels Arts & Crafts used to sell many moons ago.


I wanted a stained wood look for the top. I don't have any stains, so I used a mixture of watered down acrylic paints to give it a similar look. 


This is what the cabinet originally looked like. I have a few of them (different designs) that I am now so happy I thought to buy. Even though at the time I had no idea what I was going to do with them all. LOL I'm glad I got them when I did. Michaels stopped selling them shortly after I bought them. They were only $1 and can easily be taken apart. I used the top part, turned upside down for this project. 


I hope you are all doing well, and finding time to get crafty. 

Wishing you all an amazing week! 

xo,
Iris :)


Tuesday, June 16, 2015

My Sweet Romeo...

My sweet boy put up a brave fight, but it was all just taking too much of a toll on his tiny body. I miss him dearly and my heart is broken. I still cry for him and hate the last images I have of him in my head. He was my first pet and the most absolute sweetest soul ever. He was loving, curious and playful. He was always happy to see me, even if I was only out of the room for a few minutes. He was my shadow. =)  

Momma loves you sooooo much, lovebug. I can't wait to see you again and kiss your tiny little face off! =*

RIP 
04/22/2009
-
02/19/2015


XOXOXOXO <3 <3 <3

Monday, December 22, 2014

Update: Romeo's Vasculitis

Unfortunately, Romeo has worsened over the last few weeks. He has a secondary bacterial infection on his lesions, which the specialist wants to treat with Doxycycline based on his last culture results. For now, she is keeping him off steroids due to this. The lesions on his ears and paw pads started deteriorating again, to the point where his paw pads split open and were bleeding again.

The specialist has discontinued Pentoxifylline and Protopic. She has increased the dosage of Cyclosporine. Her goal is to taper it to the lowest effective dose since this medication may increase the risk of opportunistic infections; damage to liver, kidneys or other organs. Romeo is currently battling a very bad bladder infection.

The specialist wants to start using Mupirocin, to be used generously on his lesions twice a day for resistant bacteria. She will start more steroids once his bacterial infection has improved. I also have to apply Easotic to his lesions as well as bathe him twice a week with Malaseb shampoo.

Since Romeo isn't showing improvements on his current treatment plan, the specialist is seriously considering treatment with Dapsone. It is a sulfa antibiotic that seems to be effective for Vasculitis, but can cause liver toxicity. There is also a treatment called "intravenous immunoglobulin therapy" that we can consider as well, but is quite expensive.

Based on my talks with the specialist, I would consider the Dapsone treatment. I am extremely concerned about the liver problems it can cause though, because Romeo is only 3lbs. He has a very tiny body, so you can imagine what the size of his organs must be. It worries me to put him on such an aggressive treatment. Romeo is very special to me, and I am afraid of him having irreversible liver damage that may affect his quality of life to the point of euthanasia. It has happened in some cases.

At this point, I am feeding him whatever he will eat. His appetite has substantially decreased and I need him to eat in order to give him his medications. I still haven't found something he will eat enough of so that I can give him his medications as prescribed.

The CareCredit card I have for his medical treatment is now maxed out at $1700. His last appointment this past Tuesday, December 16, 2014 was a total of $120.31 and that maxed out his card. At this point, I don't know what else I can do for him. If anyone knows of or can recommend anything, I am more that grateful to hear it.

Please remember, Vasculitis is an immune mediated attack on his blood vessels. The hope is that we can get him into remission and then if he is not vaccinated again, it will not come back. Please help me to continue getting Romeo the treatment he needs. I have done all I can to this point, but can no longer afford it.

If you or anyone you know can afford donating even $1, please consider doing so. Every little bit does help in these circumstances. I can not express my gratitude enough for those who have donated and for those who have helped spread the word. Thank you!

You can read more about Romeo's condition in my previous post or by visiting his page at: www.gofundme.com/c8gy4o

Have a beautiful week and Happy Holidays!

Monday, August 11, 2014

Update on Romeo...

After visiting the veterinary dermatologist this past Friday, Romeo was visually diagnosed with vasculitis. A biopsy can be done to attempt to confirm this diagnosis, but I can't afford it. 

Another issue is that in doing the biopsy he will lose a significant piece of his ears. Since they have significant deterioration, they would have to, not only take the affected area, but a little of the surrounding as well. He would also lose an entire paw pad wherever the biopsy is done, again, because of the same reason. See, Romeo is a very small dog. He only weighs three pounds. He has a tiny body.

The dermatologist said that the vasculitis may have been caused by his annual vaccinations. It seems that in small dogs the body over-reacts to their vaccines and the result causes blockage of tiny blood vessels resulting in ulceration and death of tissue, which is what Romeo currently has on his ears, wrists, paw pads and tip of his tail. 

I've decided to start treatment to try and cure the ulcerations, swelling and irritations. They may or may not work. It will be trial and error depending upon how he reacts to the medications. The dermatologist has started him off on three. One of the medications alone is $260. Because Romeo is so small the meds need to be compounded and this will take a few days. I went ahead and had the pharmacist do it, but at this point I still don't know how I will pay for them. If these medications do not work, they will change them to stronger immune suppressants. 

I was able to take him to the dermatologist visit thanks to the donations I received on GoFundMe.com and donations made by my sisters co-workers. In total, $200 was raised. 

I will no longer be able to vaccinate Romeo. If I do so, the reaction can start all over again and may be worse next time. I'll have to get his blood drawn for antibody titers to ensure that he is still protected from those viruses. 

His treatment will be continuos until he can be completely healed and it will be pricey. The only reason I resorted to the GoFundMe.com website is because I honestly cannot afford the costs. If you know of someone that can donate $1 or more please please share his link: http://www.gofundme.com/c8gy4o via Facebook, Twitter, Email or through any other social media. I really need the help to keep his condition from getting worse.

Thank you for anything you can do. I sincerely appreciate it.

This is what Romeo's ears look like:

He also has to wear booties until his paws completely heal.

Thank you for taking the time to read about my Romeo's condition.
I hope you are all having a beautiful week!   =)